Posts

Showing posts from 2017

Arduino with Speakers Project #01 a
Image
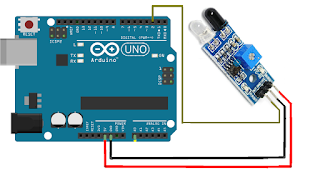
Arduino with Speakers Project #01 a Introduction In this project the speaker will make sound whenever the infra red (IR) sensor connected to the Arduino detects any obstacle. Elements Required  Arduino Speakers Infra Red (IR) Sensors Breadboard Connecting Wires Infra Red (IR) Sensors  IR Sensors work by using a specific light sensor to detect a select light wavelength in the Infra-Red (IR) spectrum. By using an LED which produces light at the same wavelength as what the sensor is looking for, you can look at the intensity of the received light. When an object is close to the sensor, the light from the LED bounces off the object and into the light sensor. This results in a large jump in the intensity, which we already know can be detected using a threshold. IR Sensor Connection With Arduino Connections of IR Sensor The IR Sensor have three pins: Vcc : connect to 5V of Arduino GND: connect to Ground of Arduino O/P : Output connect to I/O p...

Speakers with Arduino

Image
SPEAKERS ARDUINO INTERFACE Arduino Speaker Setup INTRODUCTION  This Arduino project is one of the most simplest Arduino projects which you can build in minutes. The main thing which makes this project super simple is that this project requires only one extra component. If you are new to Arduino, this tutorial will help you get familiar with Arduino and learn the basics of Arduino programming. This musical project has a speaker which plays out a song. If you ever wanted to add some sound to your existing project, you can do it easily with this Arduino speaker tutorial. You can even make a musical car reverse horn and make it play the latest songs always. You can change it easily by uploading a new program. If you still remember how you made ringtones on those old Nokia cell phones, you pretty much have all the knowledge required to make any song with this project. Let’s get started. What are the stuff required to do this? An Arduino A speaker or a ...

Distance on LCD display using Arduino and HC-SR04 Ultrasonic Sensor

Image
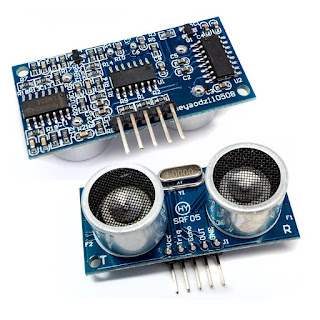
Distance On LCD   In this blog the distance measured by the Ultrasonic Sensor is Displayed on the LCD display using Arduino. Ultrasonic Sensor (HC-SR04) Ultrasonic ranging module HC - SR04 provides 2cm - 400cm non- contact measurement function, the ranging accuracy can reach to 3mm. The modules includes ultrasonic transmitter, receiver and control circuit.  The basic Principle of work: Using IO trigger for at least 10us high level signal. The Module automatically sends eight 40 kHz and detect whether there is a pulse signal back. IF the signal back, through high level, time of high output IO duration is the time from sending ultrasonic to returning. The total distance = (high level time x velocity of sound)/2 velocity of sound = 340 m/s Wire connections for the Module Complete circuit The module have 4 pins : VCC power supply Trigger Pulse Input Echo Pulse Output Ground 0V Connection with Arduino Connect Vcc to 5 V power sup...

LCD (Liquid Crystal Display) Arduino Interface

Image
LCD (Liquid Crystal Display) Arduino Interface   LCD (Liquid Crystal Display) screen is an electronic display module and find a wide range of applications. A 16x2 LCD display is very basic module and is very commonly used in various devices and circuits. These modules are preferred over seven segment and other multi segment LEDs. The reasons being: LCDs are economical; easily programmable; have no limitation of displaying special & even custom characters (unlike in seven segments), animations and so on. A  16x2 LCD  means it can display 16 characters per line and there are 2 such lines. In this LCD each character is displayed in 5x7 pixel matrix. This LCD has two registers, namely, Command and Data. The command register stores the command instructions given to the LCD. A command is an instruction given to LCD to do a predefined task like initializing it, clearing its screen, setting the cursor position, controlling display etc. The data register store...