Posts

Scan the ip on your network

********** To find the hosts on your network************* Generally, nmap is quite useful to quickly scan networks. To install nmap, enter the following command in the terminal: sudo apt-get install nmap Once the application is installed, enter the following command:   nmap -sn 192.168.1.0/24 This will show you which hosts responded to ping requests on the network between 192.168.1.0 and 192.168.1.255. ********* To find the Ip used on the network *************** First install arpa-scan using command sudo apt-get install arp-scan the for saning use the command sudo arp-scan 192.168.1.0/24
Enable SSH in ubuntu

>>first install using command >>install the openssh on your system sudo apt-get install openssh-server >>gives out the status of the server running or not sudo service ssh status >>can configure the file vi /etc/ssh/sshd_config >> can login in your own host server ssh localhost

Basic Linux commands with SD card

dd use of the dd tool can overwrite any partition of your machine. If you specify the wrong device in the instruction, you could delete your primary Linux partition. Please be careful.  df -h to see which devices are currently mounted.  dmesg | tail display the most recent system messages, which should contain information on the naming of the SD card device. The naming of the device will follow the format described in the next paragraph. Note that if the SD card was not automounted, you do not need to unmount later.  unmout /dev/sdx1 Run umount /dev/sdX1 , replacing sdX1 with whatever your SD card's device name is, including the partition number. Copying the image to the SD card In a terminal window, write the image to the card with the command below, making sure you replace the input file if= argument with the path to your .img file, and the /dev/sdX in the output file of= argument with the correct device name. This is very important, as you wil

ENABLE THE SSH IN RESPBERRY PI 3

Image
Raspberry Pi 3 Raspbian Jessie with WiFi, SSH, Headless Setup with No Keyboard or Ethernet Dec 13, 2016 • admin Raspberry Pi 3 Truly Headless Setup A quick guide to getting your Raspberry Pi 3 running in headless mode with SSH and WiFi without a Keyboard, HDMI or Ethernet Edit [16th August, 2017 - I’m slow and lazy? :(] Since I made this blog, Raspberry Pi has had several updates, and one of them makes it easier to set up a headless Pi without these many steps . Thanks Bernhard Reinel for pointing this out in the comments. Motivation: I just purchased the Raspberry Pi 3 Model B and was excited about it right until the moment it arrived. I quickly realized that I needed a MicroSD card to put software on, a power supply to keep it powered and Ethernet for Internet and a USB keyboard to run commands on it. I had a power supply from one of my other devices, and I walked to a nearby store and bought a MicroSD card (I swear I had one lying around…). I

Efficently Reading Quadrature output on arduino

Efficiently Reading Quadrature With Interrupts Once you start wanting to control the position of a motor through feedback control, you will likely end up using a rotary encoder as the feedback device. Encoders can be broadly categorized as: Absolute position Incremental position Absolute position encoders will tell you what the angular position is all the time, even between power cycles. Most use "grey code" (a modified form of binary) with several "tracks" (bits) to read position. Incremental position encoders will tell you what the angular position is, but only relative to where it was when you started paying attention (usually on power-up). Two common types of incremental outputs are: Incremental (clever name) Quadrature Incremental is rather useless for position control because it doesn't give you any information about what direction you are turning, just that you are turning. Quadrature encoders give you direction as well as

QUADRATURE ENCODER

Image
Rotary encoder is a sensor attached to a rotating object (such as a shaft or motor) to measure rotation. By measuring rotation your robot can do things such as determine any displacement, velocity, acceleration, or the angle of a rotating sensor. 1.0 Introduction A typical rotary incremental encoder consists of a light-emitting diode (LED), a disk, and a light detector on the opposite side of the disk (see next figure). The disk, which is mounted on the rotating shaft, has patterns of opaque and transparent sectors coded into the disk. As the disk rotates, the opaque segments block the light and, where the glass is clear, light is allowed to pass. This generates square-wave pulses, which can then be interpreted into position or motion. These pulses can be read by microcontroller as part of a PID feedback cont System to determine translation to distance, rotational velocity, and/or angle of a moving robot or robot part. For instance, if you have a wheel rotatin

Vim Editor commands

> to open a file in vim vim  file_name.extension > navigate can navigate up and down with key "j" and "k" or with the up down arrow > insert or edit the code press "i" to go the insert mode in the vim > to write a command for the vim press "shift + :" and then write the command and hit enter >commands : following are the some command which are helpful in vim >> write and quit : wq >> to undo the editing : u >> only write but remain in the file : w  >> to close a tab without making any editing : q! >> to close a vim tab : q >> to delete the lines containing a particular pattern : g/pattern/d  >> search in the file : \search_word_or_latter >> opening multiple files in different tabls vim -p file1.extension file2.extension file3.extension .. >> if u opened a file and now want a new file to open in a new tab : tabnew file.txt if u omit the file name

Linux wifi problem in hp Laptop

if the wifi is working well in the windows and not in range in the linux then here is the solution type the following commands in the terminal 1> command to remove       don't panic this will not remove any of the file which can harm your system       sudo rm /etc/modprobe.d/rtl8723be.conf reboot the system and give a try to wifi if not then type the second command 2> below is the command copy and paste in terminal   echo "options rtl8723be ant_sel=2" | sudo tee /etc/modprobe.d/rtl8723be.conf reboot the system and enjoy the wifi and let me know if it worked or not it must work 

Arduino with Speakers Project #01 a

Image
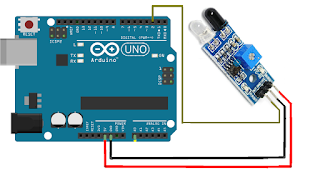
Arduino with Speakers Project #01 a Introduction In this project the speaker will make sound whenever the infra red (IR) sensor connected to the Arduino detects any obstacle. Elements Required  Arduino Speakers Infra Red (IR) Sensors Breadboard Connecting Wires Infra Red (IR) Sensors  IR Sensors work by using a specific light sensor to detect a select light wavelength in the Infra-Red (IR) spectrum. By using an LED which produces light at the same wavelength as what the sensor is looking for, you can look at the intensity of the received light. When an object is close to the sensor, the light from the LED bounces off the object and into the light sensor. This results in a large jump in the intensity, which we already know can be detected using a threshold. IR Sensor Connection With Arduino Connections of IR Sensor The IR Sensor have three pins: Vcc : connect to 5V of Arduino GND: connect to Ground of Arduino O/P : Output connect to I/O pin of Ard

Speakers with Arduino

Image
SPEAKERS ARDUINO INTERFACE Arduino Speaker Setup INTRODUCTION  This Arduino project is one of the most simplest Arduino projects which you can build in minutes. The main thing which makes this project super simple is that this project requires only one extra component. If you are new to Arduino, this tutorial will help you get familiar with Arduino and learn the basics of Arduino programming. This musical project has a speaker which plays out a song. If you ever wanted to add some sound to your existing project, you can do it easily with this Arduino speaker tutorial. You can even make a musical car reverse horn and make it play the latest songs always. You can change it easily by uploading a new program. If you still remember how you made ringtones on those old Nokia cell phones, you pretty much have all the knowledge required to make any song with this project. Let’s get started. What are the stuff required to do this? An Arduino A speaker or a piezo buzzer